↓Skip to main content

Git and GitHub in VS Code: A Step-by-Step Walkthrough

·9 mins

This walkthrough is the hands-on companion to Why Git and GitHub Belong in Public Health. It follows the same small team and their Power BI report, one step at a time, showing each action on the command line and in VS Code’s Source Control panel.

Before You Start #

You need Power BI Desktop, Git1 and VS Code2 installed, and a GitHub account3. All four are free. On a managed work laptop, you may need to request the installs through IT. When installing Git for Windows, the default options are fine.

  • Practise on a copy of a report, not the live one.
  • Keep repositories out of folders synced by OneDrive or SharePoint (on many work laptops, that includes Documents), because syncing and Git can interfere with each other. A directory such as C:\git\ works well.
  • Commands are typed in a terminal. In VS Code, open one with Terminal → New Terminal.
Before your first real commit, read Handling Sensitive Data and set up a .gitignore. Anything you commit stays in the history, even if you delete it later.

The Walkthrough #

Step 0 One-time setup

  1. Install Power BI Desktop, Git and VS Code (see Before You Start).
  2. Tell Git who you are, since every commit records a name and email, and choose a few defaults. Run these once in a terminal:
# Name to display for commits
git config --global user.name "Your Name"
# Email should match your GitHub email
git config --global user.email "you@example.ca"
# Rename first branch of every new repository to "main"
git config --global init.defaultBranch main
# Use VS Code (instead of Vim) when Git asks for a message
git config --global core.editor "code --wait"

These settings apply to everything you do in Git on this computer. Anyone who can see a repository can see the email on its commits; to keep yours private, use the noreply address listed under GitHub’s Settings → Emails.

  1. Sign up for GitHub (or sign in), and ask your organization’s GitHub administrator to add you to the organization.
  2. Sign in from VS Code: click the Accounts icon (bottom left) and choose Sign in with GitHub. If it isn’t offered, VS Code asks you to sign in the first time you publish or clone. VS Code then handles authentication when you push, pull or clone, with no SSH keys or tokens needed.

Step 1 Create a repository

# Move the terminal into your empty project directory
cd path/to/empty/directory
# Turn that directory into a repository
git init

Git prints a one-line confirmation (Initialized empty Git repository in …) and creates a hidden .git directory. It can now track changes here, but it records nothing until you commit.

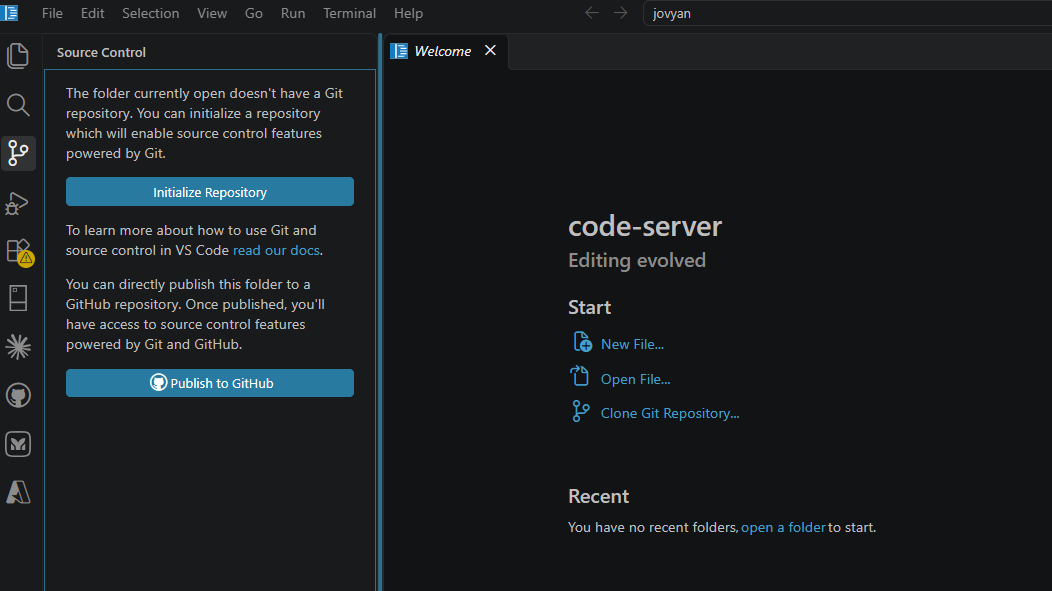
VS Code Source Control panel for a directory that is not a repository yet, with the Initialize Repository button
Initialize Repository in VS Code

VS Code: open the directory (File → Open Folder), go to Source Control and click Initialize Repository.

Step 1b Save the report as PBIP

In Power BI Desktop, open a copy of the report, choose File → Save as, pick Power BI project files (*.pbip) and save it into the repository directory as WaterReport. If that option isn’t listed, turn it on under File → Options and settings → Options → Preview features.

Power BI creates WaterReport.pbip, two directories (WaterReport.Report for pages and visuals, WaterReport.SemanticModel for measures and the data model) and a .gitignore file.

Before staging anything, open .gitignore and add the starter entries so data and credentials stay out of Git.

Step 2a Stage changes

# Stage everything in the directory ("." means "this directory")
git add .
# Or stage a single file or directory
git add README.md

A PBIP report is the .pbip file plus its two directories, so stage all of them; git add . does this.

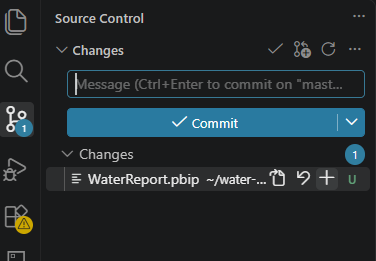
Source Control panel listing WaterReport.pbip under Changes, with the plus (stage) button beside it
Staging in VS Code

VS Code: in Source Control, hover over a file under Changes and click + to stage it (or + on the Changes heading to stage everything).

Step 2b Commit

# Commit the staged changes with a message
git commit -m "Add existing water report as PBIP"
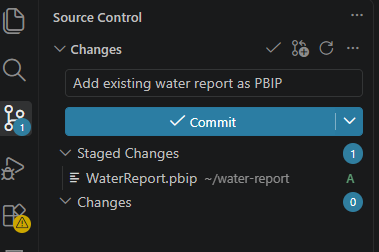
Source Control panel with the message Add existing water report as PBIP typed in and WaterReport.pbip under Staged Changes
Committing in VS Code

VS Code: type a message in the box and click Commit.

Step 3 Check status

git status

Run it any time. For example, with WaterReport.pbip staged and a new README.md not yet added, it prints:

On branch main
Changes to be committed:
  (use "git restore --staged <file>..." to unstage)
        new file:   WaterReport.pbip

Untracked files:
  (use "git add <file>..." to include in what will be committed)
        README.md

It shows the current branch (main), which changes are staged for the next commit, and which files Git isn’t tracking yet.

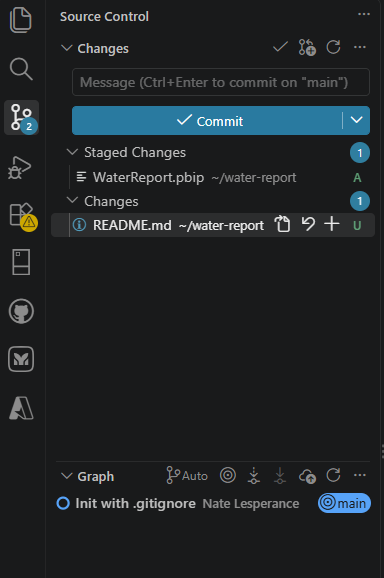
Source Control panel showing WaterReport.pbip under Staged Changes and README.md under Changes
Staged and unstaged changes in VS Code

VS Code: the Source Control panel lists Staged Changes and Changes separately; the current branch name appears at the bottom left of the status bar.

Step 4 Create and switch branches

# Create a new branch and immediately switch to it
git switch -c fix-date-filters

# Switch back to an existing branch
git switch main

Close Power BI Desktop before switching branches, then reopen the report afterwards, so it loads that branch’s files.

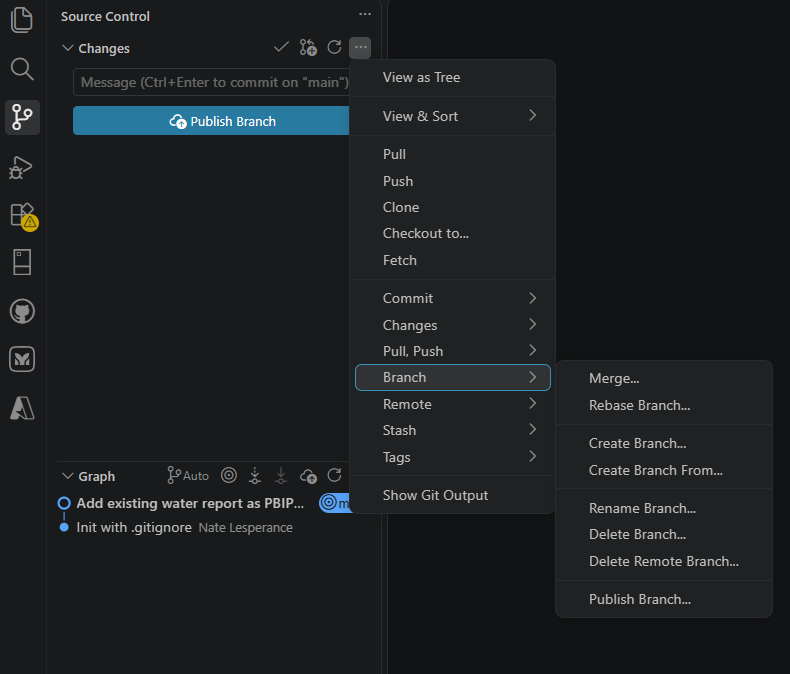
Source Control more-actions menu open at Branch, showing Create Branch and other branch actions
Creating a branch in VS Code

VS Code: to create a new branch, click the … menu → Branch → Create Branch. To switch to an existing branch, click the branch name at the bottom left of the status bar (or … menu → Checkout to) and pick it.

Step 5 Merge a branch

# Switch to the branch that should receive the changes, then merge
git switch main
git merge fix-date-filters

# Optional: delete the merged branch
git branch -d fix-date-filters
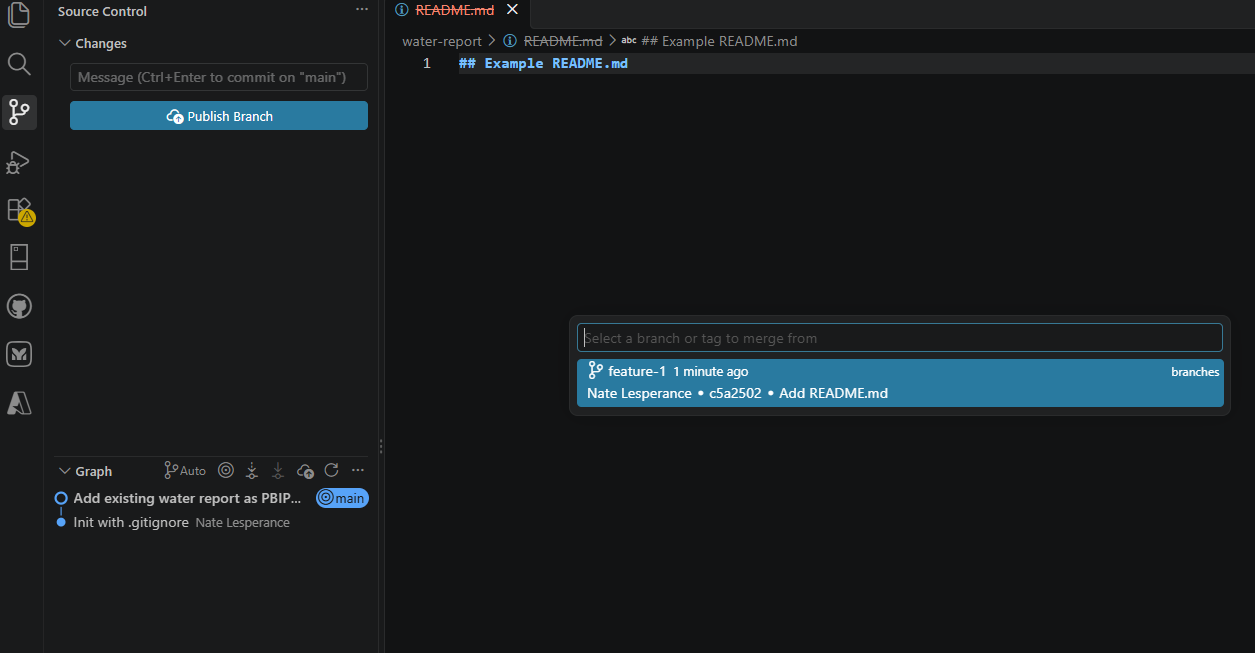
Merge picker asking for a branch to merge from, with feature-1 listed
Merging a branch in VS Code

VS Code: switch to main, then in Source Control open the … menu and choose Branch → Merge…, then pick fix-date-filters.

Step 6 View history and revert a commit

# One line per commit, with branches drawn (press q to exit)
git log --oneline --graph

# See what one commit changed (use a hash from your own log)
git show 9d0c7e2

# Undo commit by adding new commit that reverses it (nothing erased)
git revert 9d0c7e2

git revert opens a suggested commit message in VS Code (if you set this up in step 0); close the tab to accept it.

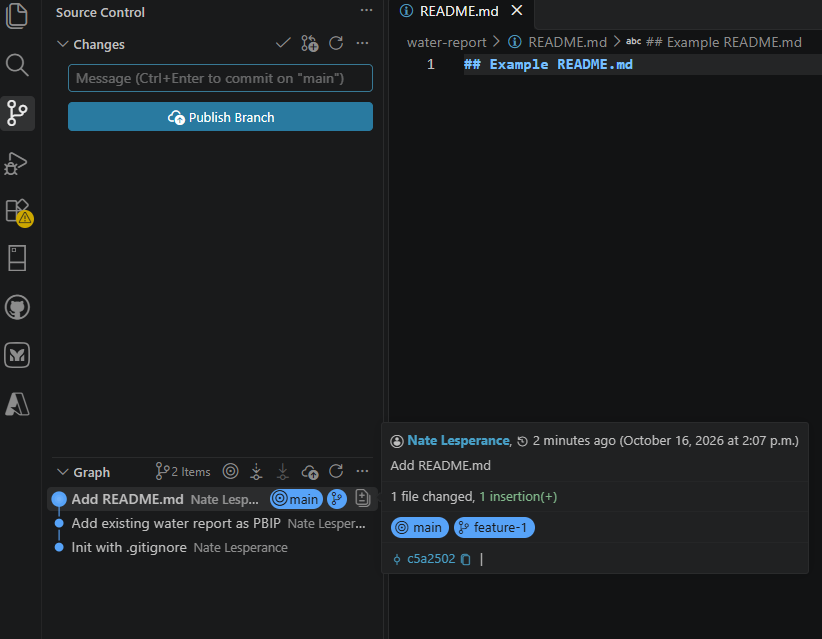
Source Control Graph listing three commits, with the details of the latest commit, including its hash, shown on hover
Source Control Graph in VS Code

VS Code: the Source Control Graph (bottom of the Source Control panel) shows the history; hover over or right-click a commit to copy its hash or view its changes. To revert, run the command above in VS Code’s terminal (Terminal → New Terminal).

Step 7 Publish and push to GitHub

A cloned repository is already connected to GitHub. A repository you created with git init needs to be connected once. On the command line, first create an empty repository on GitHub (New repository, with the organization as owner, Private selected and no README), then:

# First time only:
# Connect to the GitHub repository, naming the connection "origin"
git remote add origin https://github.com/your-org/water-report.git
# Send main to GitHub; -u remembers the connection for next time
git push -u origin main

# After that
git push
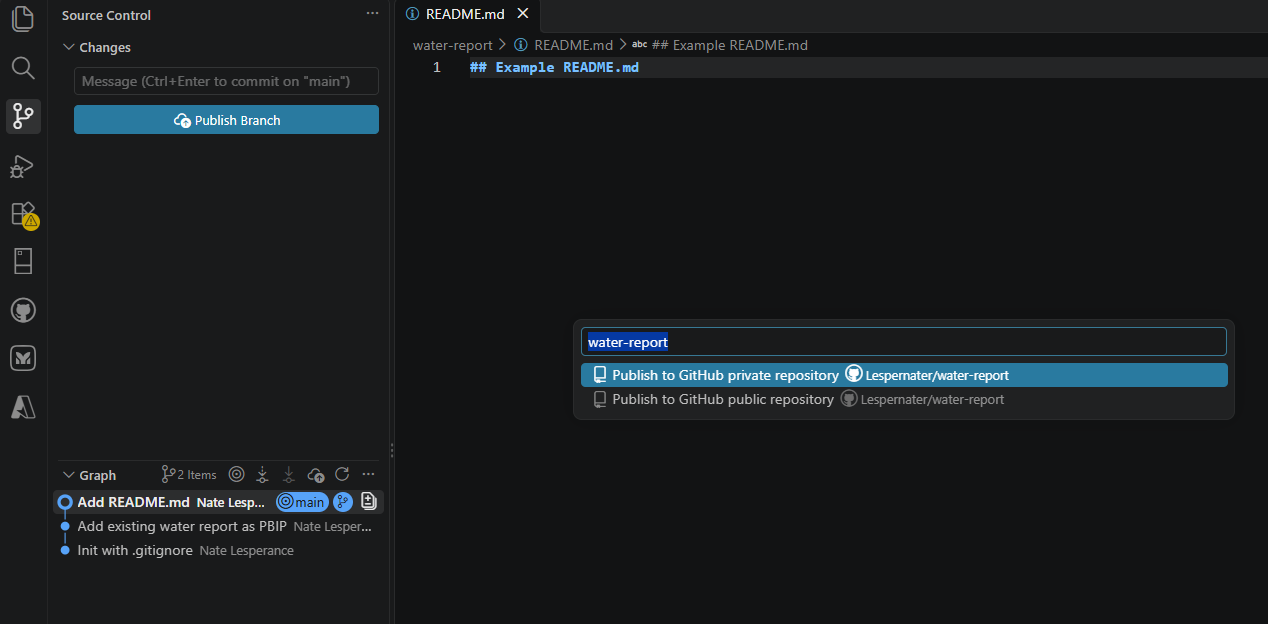
Publish prompt offering to publish the water-report repository to GitHub as a private or public repository
Publishing to GitHub from VS Code

VS Code: click Publish Branch in Source Control. If you haven’t signed in to GitHub yet, VS Code asks you to. Then choose private and the organization, and check that it says private before you confirm. Afterwards, Sync Changes pushes and pulls in one click.

Step 8 Clone an existing repository

# Download the repository into a new water-report directory here
git clone https://github.com/your-org/water-report.git
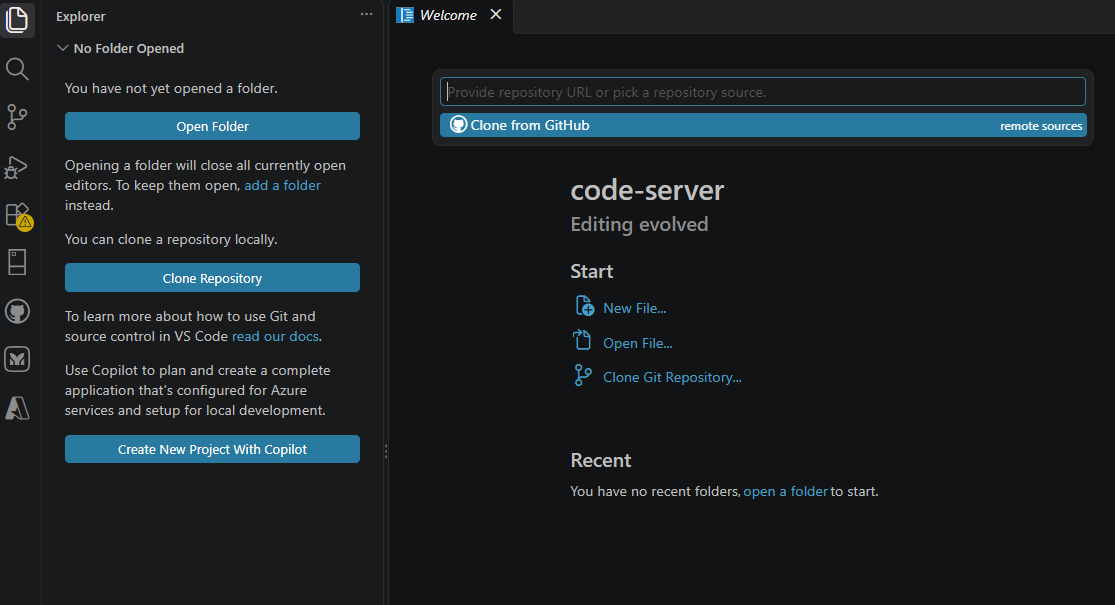
Clone prompt asking for a repository URL, with Clone from GitHub offered as a source
Cloning a repository in VS Code

VS Code: View → Command Palette (Ctrl+Shift+P) → Git: Clone, pick the repository from GitHub, then choose a directory to put it in (outside OneDrive).

Step 9 Pull the latest changes

git switch main
git pull
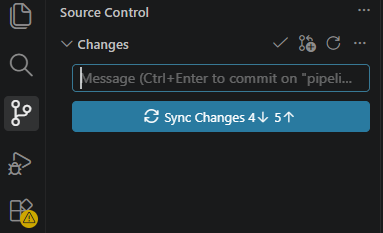
Sync Changes button showing 4 commits to pull and 5 commits to push
Pulling changes in VS Code

VS Code: the status bar shows how many commits you are behind (↓) and ahead (↑); click Sync Changes or the sync icon.

Step 10 Open a pull request

# Push the feature branch to GitHub
git push -u origin feature-water-page

Then on GitHub, open the repository and click Compare & pull request. If that banner has gone, open the Pull requests tab, click New pull request and choose your branch. Add a description of what changed and why, request reviewers, and click Create pull request.

GitHub Pull requests page with the green New pull request button
Open a pull request

VS Code: Publish Branch (or Sync Changes) pushes the branch; then open a pull request on GitHub as above.

Step 11 Review and merge a pull request

On GitHub, open the pull request.

  • Reviewers: open the Files changed tab and comment on any line. Then click Review changes, choose Approve or Request changes, and submit the review.
  • Merging: once it’s approved and any checks have passed, click Merge pull request, then Confirm merge. GitHub offers to delete the branch; that’s up to your team’s workflow, but it’s safe because its commits are now on main.

Then bring the merged result to your own machine:

git switch main
git pull

Step 12 Resolve a merge conflict

When a merge or pull stops with CONFLICT (content): Merge conflict in …, Git marks each conflict inside the file:

<<<<<<< HEAD (Current Change)
the version on your current branch
=======
the version from the branch being merged
>>>>>>> other-branch (Incoming Change)

Edit the file so it holds the correct version (or a combination), delete the three marker lines, then finish the merge:

git add .
git commit --no-edit

To give up and return to how things were before the merge, run git merge --abort.

VS Code: conflicted files appear under Merge Changes. Open one and click Accept Current Change, Accept Incoming Change or Accept Both Changes above each conflict, or Resolve in Merge Editor for a side-by-side view. Then stage the file (+) and click Commit.

Where Next #


  1. Git, “Downloads” — https://git-scm.com/downloads ↩︎

  2. Visual Studio Code — https://code.visualstudio.com/ ↩︎

  3. GitHub, “Sign up” — https://github.com/signup ↩︎

Author
MBinf · Current Team Member
Nate is a Data Engineer at Wellington-Dufferin-Guelph Public Health. Some of Nate’s past research has focused on developing genetic models for detecting viruses, building agentic systems to assist in analysis of large biological datasets and environmental impact assessments of open-source models. Nate believes in the value of applying open-source software to build a trustworthy and capable health system that benefits his community.